When I last worked at Lu's and Chris's home, the weather was so nice I really enjoyed making storage units outside. Well, it is no longer summer or fall for that matter - IT'S VERY COLD here in Wisconsin!
Lu and I (and a bit of Chris when we needed muscle!) worked on the baseboard trim while it was hovering around freezing. I bought three 6 foot x 1" x 12" pine boards and cut them down to 3 boards each at 3.5 inches. (In carpenter terms - I ripped the boards.) This gave me a total of nine 6 foot boards that were 3.5" wide. This is the same height as the 2x4's used to raise each of the storage units we built. I primed them and brought them to Lu's house for more precise measurements.
Sorry, I don't have detailed pictures, but here you can see we 'dry fitted' the baseboards before they were painted the blue trim color and installed permanently. It makes a nice clean finish.
I needed to cut a hole for this strange protrusion that may be old gas lines or old knob and tube wiring. Does anyone know what this is? I thought I had cleverly used Chris's
Dremel tool to carve out the back of the baseboard, but the board continued to stick out. We had many problems with the walls as they curve both horizontally and vertically in various places. Gee - I wonder who installed that dry wall! :)
After the baseboards, we moved on to two more tricky areas - The window and the door to the kitchen never had the trim fully completed. Lu used newspaper to create a template for us to cut some scrap pine and I used the jigsaw to cut it out.
 |
| Using a level to draw a straight line |
The top of the door was tricky in a different way. The ceiling slopes toward you as you look at the door frame. There was definitely a gap to cover, but we couldn't use the same size trim for the top as the sides. We did not want the side trim to go all the way to the ceiling so we ended up cutting a piece of pine as outlined in black. The door trim will go where I outlined in pink. The arrows below are pointing to the thin vertical strips of wood needed to fill in gaps between the door jam and the drywall. I used a 1x2 piece of wood and ripped it lengthwise to get the two strips and with a little finessing on the top ends we were able to fit them in nicely. (Finessing was done carefully using the table saw which I'm much more comfortable with then the Dremel tool!)
Let's move on to sewing. This is once again straight from Lu...and actually occurred before we worked on the baseboards!
I ran into a dilemma with the material for the
cushions. This is the material that I
really liked, but I was buying the material with my 50% off coupons, which were
valid during different time-frames. I
got the curtain material one day, and then went back a couple of days later to
get the cushions. Had to wait till the
following Sunday for the last 50% coupon to take effect, but by then this
material was no longer available. I
looked all over the store, not just where I originally located it; looked
online through JoAnn’s, and even went to another store location. No luck.
That meant having to look for other material for the cushions.
 |
| Lu originally wanted this for the cushions. |
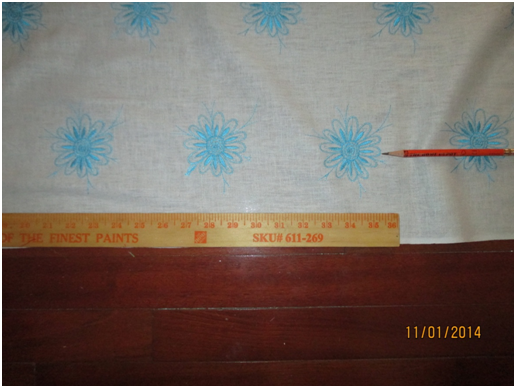
This material drew my eye.
It’s similar to the original box material, but it has random dots and a
light/dark splotchy pattern instead.
There are silvery/gray-ish dots and the teal dots that match the curtain
flowers and material that I used for the hanger storage.
So based on the color palette, I’m going with the dot
material for the cushions. I’ve decided
on making tab curtains, so the remaining teal material that I used for the hanger
storage will be used for the tabs.
The only issue I encountered when cutting out the material
for the cushions, is there was only a small amount left; not enough for the.cording.
Chris suggested that I use the curtain material for the
cording on the cushions.
I needed 80” for each cord, so I decided to use both edges of
the curtain material. There are 4 cords
total.
I had gotten the rest of the bolt for the curtain material,
which was just over 5 yards, more than I needed for the curtains, but I figured
it would come in handy.
The cording is ¼” wide.
I measured out to 80”, then put scotch tape over where I was going to
cut. I repeated that for all four cords.
I didn’t want to deal with zippers on the cushion covers, so
I decided on a split opening in the back. These are the materials needed for each cushion:
·
cushion, cut to size
·
top and bottom panels
·
long panel for 3 edges
·
2 panels for split opening
·
2 lengths of cord
·
2 lengths of cord covering
 I sewed the hem on the split edges; then sewed the edging
pieces together. Next step was to cover
the cording and pin it to the edging. I
got as far as sewing one length of cording to the edging and pinning it to the top
panel, then life happened again and I was gone for a week.
I sewed the hem on the split edges; then sewed the edging
pieces together. Next step was to cover
the cording and pin it to the edging. I
got as far as sewing one length of cording to the edging and pinning it to the top
panel, then life happened again and I was gone for a week.
Then, you came over and we worked on the baseboard and
remaining trim.
So, you can probably see we will not finish before Thanksgiving. At least the room is organized and useful at this point. I can't promise progress on this project when I post again in 2 weeks, but I do have some great fall pictures from our trip to Ohio in October to share.
Have a wonderful Thanksgiving holiday and relax!
From...BusyBzDesigns


